M I L I T A R Y I N S T R U C T I O N S
F O R
OFFICERS
D E T A C H E D I N T H E F I E L D ;
C O N T A I N I N G ,
F O R F O R M I N G
with P L A N S O F T H E M a n o e u v r e s
NECESSARY IN CARRYING ON THE
P E T I T E G U E R R E.
PAS EST ET AB HOSTE DOCERI. Ovid
By MICHAEL COX, Esq;
P H I L A D E L P H I A :
Printed and sold by R. Aitken, Printer and
Bookseller, opposite the London Coffee-
House, Front-Stereet.
M . D C C C . X I I.
[ Price, Bound, Seven Shillings and Six-Pence ]
Purpose
The Use of Extended Order
Flanking Shots
Rifles
Cavalry Screen
Isolation, ZOC, and Melee
Command and Control
Conclusion
~~~~~~~~~~~~~~~~~~~~~~~~~~~~~~~~~~~~~~~
Purpose
Over the course of the past few years I have made some observations about the nature of our warfare in 1776 and 1812. Some of these become quite obvious with time, others came clear in a moment of revelation.
I make no claim to the originality of thought outlined here. In fact, I have learned most in some of my more humiliating defeats. The observation of skilled opponents has lead to my adoption of some of their successful tactics.
By assembling these tactics here, I hope to help get newer commanders on solid footing for their exploits against the British. As most of my experience has come in battling the soldiers of Britain and their Hessian and Native Allies, I will be primarily addressing tactics from an American perspective.
Ideas here are by no means set in stone, but should serve as food for thought. Our formidable opponents continue to evolve and as they do, our strategies must be re-evaluated with them. I hope they are found useful.
Brig. Gen. Michael COX (U.S. Ay.)
~~~~~~~~~~~~~~~~~~~~~~~~~~~~~~~~~~~~~~~
The Use of Extended Order
American formations are often
saddled with inexperienced troops drawn from the surrounding countryside. While
often available in good number, they are almost always of poor quality. To
offset this, they are able to form extended order (X order) and are often
equipped with rifles.
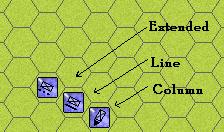
Units in Extended, Line & Column Orders
In X order, a unit can move rapidly, without the danger of disorder. (A very important consideration while playing with the optional Line Disruption rule. n.b. It is generally to the advantage of an American in a situation with Militia to request this rule.) A unit in X order can take advantage (as if they were in column) of roads as well. Furthermore, they maintain their ability to fire and inflict damage on the enemy.
From a defensive standpoint it is ideal for blunting the effect of ranged fire. Shots against a unit in X order tend to have no effect or simply increase the fatigue of the unit. Of course units with high fatigue are prone to routing, so keep that in mind. There is, in truth, nothing you can do about this. Keeping units in command is the only aid (and avoiding taking flanking fire or other situations requiring a morale check.)
Due to the open nature of X order (the files of two men acting 10 feet or more apart) the approach of the enemy with the intent of melee will cause the units to likely fall back. In fact, they melee at ½ value. The upside of this is that their casualties are reduced by a like number. If you let a unit get cut off or out of support of its parent regiment, it will likely be surrounded and quickly eliminated, as a good player will crush it.
Flanking Shots
In general, the companies of the British are larger than our own. It is common to face units 60 and 70 men strong with companies that number only 20 or 30 brave souls. However, our smaller companies offer much in terms of flexibility.
While units cover the fronts of the enemy, others can maneuver to find an advantageous angle. Once obtained, the smaller units can take shots on the enemy flank causing disorder and the need for morale checks. Eventually even good units will fatigue and a fatigued unit of high quality will rout. Once his line has cracked, throw your assault columns into the breach. They can melee from the flank, taking a bonus there. If they remain disordered on the next turn (they will likely recover if in command) deploy them and continue to advance and pour fire into his flanks. If you keep the pressure on him, and cause him to check morale, the small leak you create will be come a torrent of routing units.
Don’t try to win a stand up shoot out. His larger size and better quality units will get the best of you every time. Your advantage is the ability to spread out and maneuver.
Rifles
Rifles are a great equalizer between the heavily armed armies of Britain and our thinner ranks. Their greater range and accuracy make them a very versatile weapon.
On the approach, a screen of riflemen in X order can stand at a distance and fatigue the British defenders while the regiments armed with muskets form and maneuver in their shelter. Should the British defender tire of your abuse at distance and advance to strike you, companies in attack column should be poised to rapidly move to the fore and counter their thrust. If you can get the defender to sally forth from behind his prepared defenses, you have already gained much!
On defense, well positioned rifle companies can wreak havoc on the advancing enemy forces. If there is a large field of fire to cross before closing, you will have nearly 2 turns of opportunity (at the least) to cause him disruption and fatigue.
Rifles companies are likely to be trained in the use of X order, allowing them to move along the fringes, at a safe distance from the enemy, while maintaining their ability to fire. By doing so, they can be used to secure flank shots on the enemy. Eventually, they can play a key role in isolating a force before the musketeers are called in to collapse the resistance.
The option of targeting NCO’s and file closers, “Rifle Effects” is a powerful rule. In a balanced scenario it adds depth to the situation simulated. In an unbalanced one, the British ranks will soon be reduced to a quivering mass.
By losing the NCO’s and file closers (“leaders”), a unit will not be able to recover good order. A disrupted unit will not attempt to melee another unit. Assuming that you have a limited number of units armed with rifles, spread their shots around. Do not fire multiple units armed with rifles at once. Prioritize your shots: first, units which are already disordered, then by threat. I tend to look at his best quality units first, then by size.
One particularly
effective tactic is to hit the leaders first. Once this occurs, the opposing
unit should be meleed by a musket unit acting in support. Because of the lack
of leaders, the enemy will never reform to summon the courage to press home his
attack. You have now tied one hand behind his back and can focus on another
unit or group.
Cavalry Screen
While one normally associates the concept of a cavalry screen with the movements and battles of the large armies on the European Continent, their adept use in our wars is equally important. Keeping the enemy unsure of your movements will make him unconfident of his own.
The higher mobility of a cavalry unit, allows it to cover more ground, covering the movements of more than one group of men.
While on defense,
the cavalry is well suited to countering the enemy’s screen of cavalry or light
troops (if any). In force, they can repel or capture an enemy’s scouting units
and blind him. Their simple presence may be enough of a threat for the enemy
scout to withdraw. He may deploy his main force prematurely to line, risking
disorder as he advances and most certainly wasting time. They can range high in
the hills and conceal themselves at advantageous lookouts.
Isolation, ZOC, and Melee
All else in the game, all movement, disruption, command & control, all ranged fire are mere preludes to the moment of decision: the melee. It is through melee that the greatest number of troops can be eliminated; it is through melee that a physical location may be wrested from the control of the enemy. It is therefore imperative that you give yourself every advantage possible before forcing the issue.
Softening up a hex you plan to take using flanking shots to disrupt, ranged fire, and the like is important, and, assuming you have the time and the fresh troops (remember, he will be fatiguing you with his fire at the same time), should be employed.
However, the single most important thing you can do, while playing with Isolation Rules on (as you should, as it is the only way to bring the large British and Hessian companies down to a manageable size), is to use at least three of your companies to isolate his units. If you have the numbers to isolate a larger group, make every effort to do so, you will reap enormous rewards.
Isolated units will understandably become nervous and edgy, those that rout will be vulnerable to capture. (Remember: ROUTED and ISOLATED units defend in melee with a value of ZERO. In other words, as long as you have a one man, undisrupted unit in range, he can walk up to them and take their parole.)
Ideally, you should surround a large force of British forces and begin to wear them down. Meanwhile move a reserve force forward, in assault column, and when the time is ripe, move in and begin melees. After the first round of melees, you will find that some of his companies will begin to rout. Capture them while they are vulnerable. Continue to push him with melees, scoring ZOC eliminations whenever possible. By keeping good command and control, you will regain good order more often than not. Those companies not in good order should be deployed to line formation. Disordered units should support the assaulting troops by firing into the stacks of British, taking advantage of hitting exposed flanks. More and more troops will rout when you keep the pressure on him, and eventually the pocket will collapse.
Command and Control
Probably the most important, yet least understood aspects of the battles and campaigns of 1776 & 1812, are command and control. Easily understood is the use of Regimental Leaders for rallying troops and leading a melee. Troops in the vicinity of a solid leader tend to rout less often, and rally sooner. They regain good order reasonably quickly.
What is less appreciated is the importance of keeping Brigade and Divisional Leaders situated correctly. A leader who is in the command range of a higher up will have his leadership bonus increased. An important factor to consider when a Regimental Leader may have a poor or merely adequate leadership bonus.
However, the command radius of the various leaders is not readily apparent. One can find their command radius in the Parameter Data, and it may change from scenario to scenario. There is a little used (as there is no on screen button in the toolbar) option in the View drop down menu: Command Radius.
I find the most effective method is to first select a leader, then Highlight Organization, then to choose View, Command Radius. The leader’s units will be outlined in white, and the leader himself by a halo of hexes. You can then position them in the most advantageous position. If you need to stretch your lines to cover an avenue of approach, you can make a decision as to which unit to leave out of command (a grenadier or good quality light company is ideal). Behind the first line, the Brigadier can then keep his leaders in command distance, while possibly serving as a rally point to routed companies of his command. However, one should take precautions against a commando raid to your rear to take a lone leader. Check distances to cover and use ZOC to block approaches. Get him to safety when threatened!
A word should be said about the use of leaders as rally points. Brigadiers and above do not really belong in the front line. They are too valuable from a point perspective, as well as a command bonus perspective to risk them being wounded, captured or killed in a meaningless assault or by a stray bullet or shell. Except in extreme cases (taking the victory flag in the final 5 minutes of an action, offsetting an enemy leader bonus in a melee that will capture an important British leader, &c), they are best used, while keeping in contact with their subordinates, as a rally point for routed units. For them to do so, they must be in or adjacent the same hex as the routed unit.
Conclusion
I hope that the ideas put forth in this little volume have provided plenty of food for thought. Perhaps you knew most of this but needed it set forth in front of you to be reminded of what you learned previously. Maybe you are fresh from the training department and wanted to get a few more ideas before taking on a tough veteran opponent. In any case, adapt these ideas to your own style of command. There are concepts here for both offense and defense, and even remembering some of them may make the system work for you better.
One last word of advice, never give up hope until the end. Most scenarios are well designed, so that you always have a chance to snatch victory or at least a draw. The enemy is often as tired as you and he may make a mistake and open the door. Likewise, if he sues for peace, take him up on it. You may be looking good at the moment, but he may be getting stronger. If he feels hopeless, capitalize on it. In a campaign, never let him off the mat. Destroy every last unit possible, they may well resurface later on in the campaign. It is a hard thing to take a rested unit sitting in the saftey of a fort, when you could have captured him on the open road a scenario or two previously.
Discuss with your fellow officers successful (and unsuccessful) tactics. The War Room and the Training Forum are the perfect place for it.
Good luck.
Napoleon on generalship:
“Yes, I know he is good, but tell me, is he lucky?”